Payments
Upon making a successful payment, users can optionally be redirected to any webpage by specifying a custom "Success URL". This is useful for a number of use cases, for example:
- Unlocking gated content
- Displaying a fully customised ‘thank you’ message
- Suggesting additional purchases
- Displaying order status or tracking information
The success page that you display can be any existing webpage. However, we strongly suggest that the page is served over https and that the page validates the request using the authentication token before serving any restricted content.
All URL parameters are URL encoded so will need to be decoded by the page before being used.
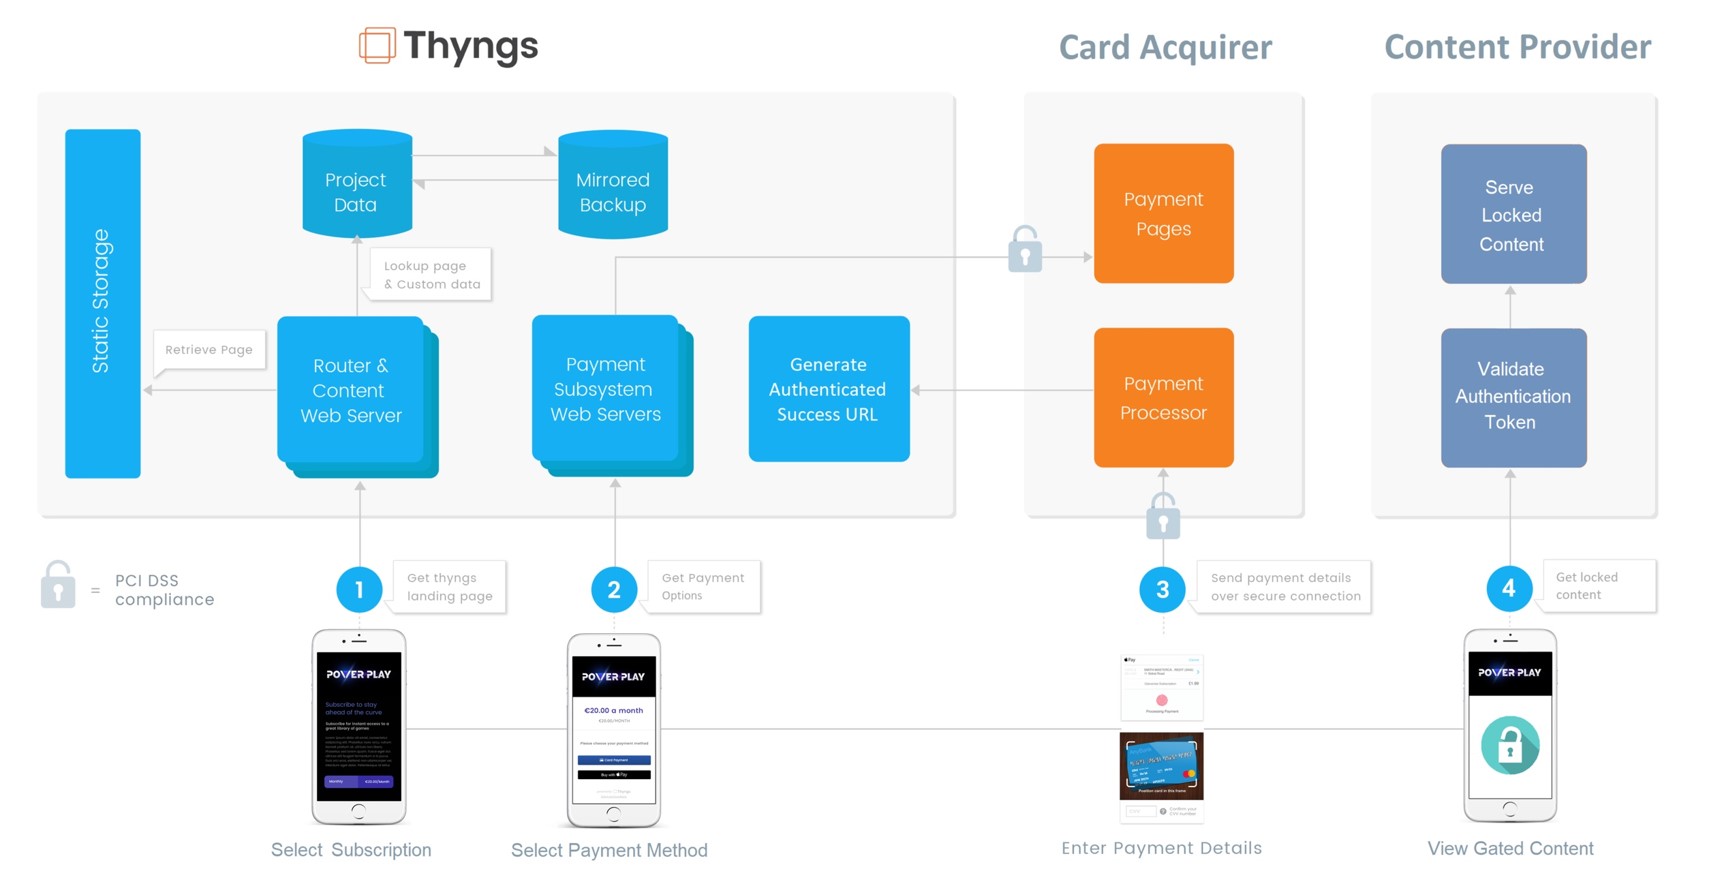
The following diagram shows an overview of this process. As a Content Provider you will need to implement the items in step 4 in the diagram below.
Get Started
The first step of integrating Thyngs payments is to configure a Success URL.
Go to MyThyngs > Developer > Payments
After a successful payment is made, the user is redirected to this URL and a number of parameters are appended to the URL, including the authentication token.
The Success URL uses basic tokenised authentication. The page at the Success URL will need to check the authentication token to ensure it matches the one defined on My Thyngs to ensure the request is valid. All Success URL authentication tokens begin with $thyngs-pk$live$ followed by a unique GUID identifier.
You can reset your authentication token at any time at MyThyngs > Developer > Payments
Parameters
The parameters added to the success URL are as follows. Please note that the value of each parameter is URL encoded so will need to be decoded before being used:
- referer - always set to thyngs
- thyngCode - the code of physical or digital item that triggered this interaction
- demo - True/False value which indicates a test payment
- conversionType - the type of payment e.g payment, subscription or donation
- amount - the value of the payment
- giftaidAdded - True/False value added to donations to indicate if a GiftAid declaration was added
- email - the email addres of the user who made the payment
- userID - the Thyngs unique identifier for the user who made the payment
- interactionTime - the time which this payment process was originaly triggered
- reference - unique reference for this payment
- authToken - the autherisation token set in My Thyngs
e.g
https://test.com/successpage/?referer=thyngs&thyngCode=AQU07772&demo=False&conversionType=subscription&amount=10.00&giftaidAdded=False&email=hello%40thyngs.net&userID=exampleID&interactionTime=08%2F06%2F2018%2016%3A57%3A08.547&reference=ch_exampleRef&authToken=%24thyngs-pk%24live%2433380d6a-5da6-4cb4-8b75-5bb478d4dfe9
Subscriptions
To fully integrate subscription based payments you will need to subscribe to Subscription webhooks.
The SUBSCRIPTION_CREATED Webhook will be sent for each subscription that is created. Any further changes to the state of the subscription will trigger the SUBSCRIPTION_UPDATED webhook to be sent.
Canceling Subscriptions
Users are sent a confirmation email after signing up for a subscription. This email contains a link to cancel the subscription at any point.
If you wish to integrate an automated method of cancelling a subscription you can send a POST request to https://pay.thyngs.net/Subscription/Cancel.
The parameters for the request are as follows.
- userID - the Thyngs unique identifier for the user who made the payment
- reference - unique reference for this payment
e.g
https://pay.thyngs.net/Subscription/Cancel?reference=ch_exampleRef&userId=exampleID
Receipts
Afer a successful payment is completed, users receive a receipt for the transaction that just occurred. This can be for donations, subscription or just a one off payment.
By default we have a generic recepit that we send to your consumers, which contains some basic information about what transaction just occured as well as some information that you can set you on the Payment Settings page.
MyThyngs > User icon on the top right > Payment Settings
Some of the information you can edit includes, a footer text and adding in a link to your terms and conditions.
Custom Receipts
On this edit page, you can also add on your own custom receipt as a html file. Information from the transaction can be filled into the receipt using tags, list of the tags can be found below.
- |AddressLine1| - your company street name and number
- |Amount| - the value of the payment
- |CompanyColour| - your company colour
- |CompanyDescription| - your company description
- |CompanyLogo| - your company logo
- |CompanyName| - your company name
- |Date| - date the payment occurred
- |FacebookUrl| - url to your facebook, set in the company edit page
- |FontColour| - font colour from the payment settings
- |FooterText| - footer text from the payment settings
- |HeaderImage| - renders the image from the page
- |InstagramUrl| - url to your Instagram, set in the company edit page
- |LinkedInUrl| - url to your LinkedIn, set in the company edit page
- |NetAmount| - the net amount of the payment
- |ObjectName| - the object that the interaction occurred on
- |OrderSummary| - list of items that have been ordered with their price
- |PageName| - the page that the interaction occurred on
- |PaymentMethod| - the method that was used by the consumer to pay
- |PhoneNumber| - your company phone number
- |PostCode| - your company postcode
- |ProjectName| - the project that the interaction occurred under
- |ReceiptDescription| - description of the transaction
- |Reference| - a reference for the transaction, references to the transaction on the payment providers platform
- |TermsAndConditionsUrl| - terms and conditions url from the payment settings
- |ThyngCode| - the code that the interaction occurred on
- |Town| - your company town name
- |TwitterUrl| - url to your twitter, set in the company edit page
- |UserFullName| - full name of the user, if they provide it
- |WebsiteUrl| - url to your website, set in the company edit page
- |VAT| - VAT amount for the payment
Our logic will find these tags within the html document and replace them with the relevant information.